3D printing is radiology's hottest topic for a reason: It can give institutions the tools they need to overhaul the workflow of surgeons and referring physicians. It can already be used to build functioning blood vessels -- and maybe soon an entire organ. These are still the early days, but radiologists are finding a dynamic and creative environment in which to work.
The promise of 3D printing was the focus of a March 31 webinar presented by the Society for Imaging Informatics in Medicine (SIIM). Three radiologists from the University of Utah shared their experiences with the new 3D printing lab they set up, the products and possibilities the technology has created, and what software works for what application.
The first part of our two-part series on 3D printing will discuss the history of 3D printing, as well as the technology behind it. The second part will cover software and the lessons learned from setting up a busy 3D printing shop at the University of Utah.
A variety of uses
There are a variety of uses for 3D printing in medicine. It can be used to create models for research, intraoperative planning or simulation, and cardiac and pulmonary surgeries, for example. Models are very useful in trauma applications, noted opening presenter Dr. Edward Quigley, PhD. Printing can also be used for drill guides and biopsy guides. Residents learn very quickly with models, and surgeons love them.
 Dr. Edward Quigley, PhD, from the University of Utah.
"Unfortunately, the elephant in the room is that there is not currently a billable code for 3D printing," Quigley said. "But if we do enough quality assessment, we may be able to show that there are added benefits to 3D printing. And if you save operating room time, your surgeons will come back and ask for it."
3D printing is almost by definition an iterative process, with layers of materials added to create an object. This means that it can be somewhat forgiving
"Always remember control-Z," Quigley said in praise of the undo key. "It's an iterative process, and you can undo things. If you think about the process like a sculptor or an artist, you're designing something in 3D space. Try and build it like an engineer. Then, to be efficient, reduce those polygons like a game designer."
History and background
When applied to medical imaging, 3D printing turns images into tangible products via additive (meaning computer-controlled) manufacturing, Quigley said. It began in 1981, when Hideo Kodama used additive manufacturing to cure a photopolymer resin and create a simple plastic model.
In 1984, Alain Le Méhauté and colleagues filed a patent for stereolithography. That same year Chuck Hull created the first prototype stereolithography printer. He also helped develop the STL file format, which is one of the most common file types in 3D printing today. The first practical applications for the new discipline were in the aerospace and automotive industries, with medical imaging coming along quickly, according to Quigley.
There are four main 3D printing methods: vat polymerization, powder bed fusion, layered object manufacturing, and fused filament or fused deposition modeling. All have different price ranges, and radiologists need to learn about the different types, their applications and costs, and their strengths and pitfalls before equipping a lab, he said.
Vat polymerization. With this method, the 3D printed object is created in a liquid bath. The stereolithography version of vat polymerization uses a roller to spread a polymer resin, which is cured by an ultraviolet laser. After each layer is deposited, the tray moves slightly and the process is repeated, allowing fast printing of high-quality models.
The polyjet or inkjet variation of vat polymerization is like stereolithography in that the process cures a liquid resin. But in this case it is applied by an inkjet-like head and cured with a light source. Depending on the equipment, the cost of equipping a lab with a vat polymerization printer can vary from $3,000 to $500,000.
"This is amazing and hypnotic to watch when it's running," Quigley said. "You can print in multiple materials; you can change materials ... it's incredibly versatile and realistic for medical models."
Powder bed fusion, or solidification. This technique uses various means to turn powders into solids. Techniques include glue or binder jetting; selective laser sintering, in which a powder is welded into place; and selective laser melting, using the laser to melt the printing medium. Laser powder forming is a process that sprays molten metal to create the object, Quigley said.
Melting can also be performed using an electron beam for high-end applications requiring great strength. Variations in casting can lead to imperfections, but electron-beam melting generally produces very high-quality, sturdy objects. Selective laser sintering uses a roller to spread the printing material, and the heat source melts it into place. The cost of equipping a lab with this process can range from $50,000 to $1 million.
Layered object manufacturing (LOM). This technique involves a laser cutting tool that selectively carves or etches a layer of material. A new layer is then added, and the process is repeated in a method akin to crafting a topical map, Quigley said. Inexpensive printing materials like cardboard, wood, vinyl, leather, even food can be used for LOM projects.
Fused filament or fused deposition modeling (FFM/FDM). These are the workhorse modalities for entry-level printing, and they are the main tools of most hobbyists and entry-level medical 3D printers, Quigley said. Flexible objects, wood filament objects, and even chocolate objects can be created with this versatile and low-cost method.
A plastic printing material is typically fed into a conical nozzle, which extrudes the material onto a printing plate using a mobile print head. The material solidifies in place and the process is repeated.
But things don't always go smoothly.
"There are a lot of problems and pitfalls in fused deposition modeling, and every week there's a new advancement that helps address some of these problems," Quigley said. "You have to build support materials into your model. If you're skipping from one location of the print plate to another, there can be retraction issues" when the material gets too hot.
The feeding of solid material to melt through the nozzle can produce uneven feeding and underextrusion, and the model can deform as it goes through temperature changes. Toxic fumes from some print materials make ventilation critical.
The University of Utah lab uses FDM to create fragile and intricate models that are designed to show anatomy for educational purposes. New color-changing modes allow the creation of multicolored models, with the ability to change materials on the fly. The process remains challenging, however.
"Every so often you'll have an underextrusion ... or a larger failure where your 24-hour print turns into a molten ball of plastic," Quigley said.
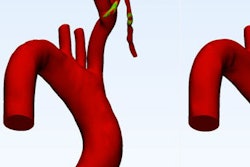
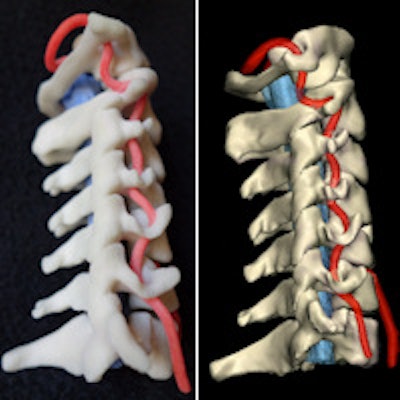
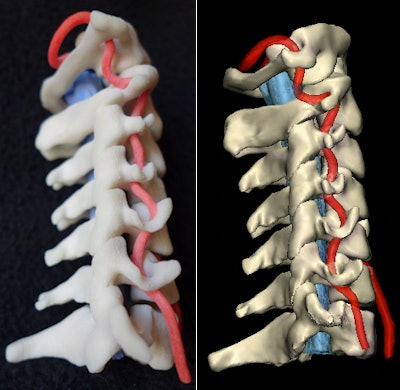 Physical 3D-printed multicolor nylon model (left) demonstrating the cervical vertebrae, vertebral arteries, thecal sac, and cord. Virtual version (right) of the printed model shows the same structures. 3D printing by WhiteClouds in Ogden, UT. Images courtesy of Dr. Justin Cramer and Dr. Edward Quigley, PhD.
Segmenting before printing
Getting objects from 3D image data means segmenting the data, and physicians are needed to guide this work, selecting the anatomy and pathology to include in the print. The radiologist develops the goal of the print, choosing print quality, method, and materials (the STL file will be output with computer-aided design software). The first print can be a practice run of lower quality to test the process.
With segmentation, the radiologist typically leverages differences in CT attenuation to separate bone, soft tissue, and air space. MRI accomplishes the same thing with tissue characteristics. As the STL file is created, the team should aim to reduce the model to the simplest level, one that will demonstrate pathology without losing the character of the original, Quigley said.
After printing, the radiologist verifies the accuracy of the model and that it serves the intended purpose. The iterative process of 3D printing allows the creator of the piece to create, fail, and modify.
"Once you have that model, you do quality control ... and some postprocessing," he said. "You tune your printer. You tune your files, and then you print again. Then ... you can clean it up, take off the rough edges, and sand and paint it. ...Radiologists can use 3D printing to facilitate imaging 3.0 -- patient-centric healthcare."
